Several of the boats I’ve built have required carts to get them from the launch-site parking lot to the water, and while the carts I’ve built have all worked well enough to carry the boats they’re made for, they haven’t been compact enough to stow neatly when it’s time for the boats to carry them. While there are, of course, many good folding and take-apart boat carts on the market, I prefer to make my own equipment—not only for the pleasure of designing and making things, but also to save money.The frames of the commercial carts are usually made of aluminum and molded plastic, and the designs don’t lend themselves to homemade wooden interpretations, so none of them were of much use in my quest to build a homemade cart that can carry the boat and take up little space on board. The cart for the sneakbox easily managed the 140-lb boat and the gear carried aboard it.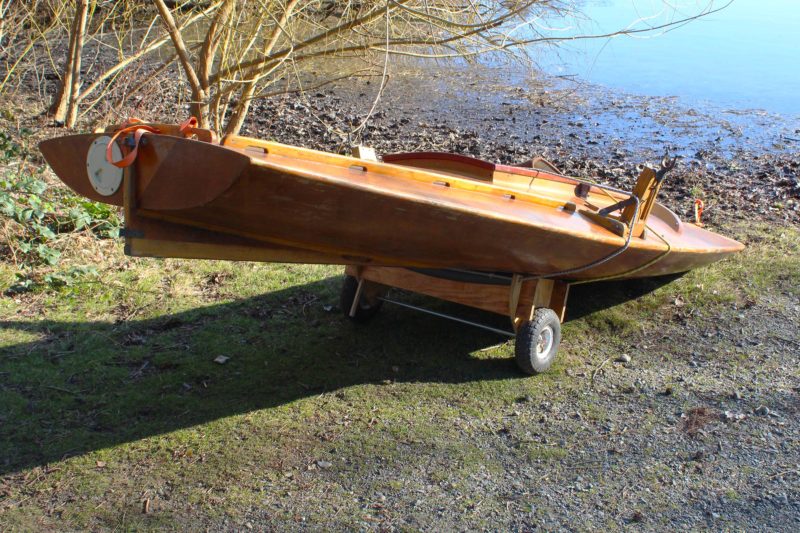 Photographs by the author
Join The Conversation
We welcome your comments about this article. To include a photo with your remarks, click Choose File below the Comment box.






“I used a compass to scribe the bottom contour of my lapstrake canoe on a scrap of plywood.” — can you elaborate? I’m not clear about that step. Nice article, by the way 🙂
Here’s a picture of scribing the contour of my sneakbox’s foredeck:
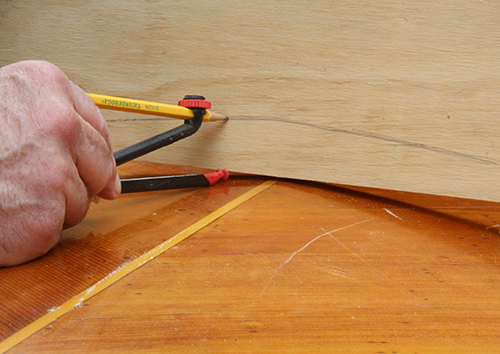
The compass is held vertically and as the leg on the boat follows the contour, the pencil makes a tracing.
Why scribe on a scrap, copy and fair with a batten, and use that to make a template? Why not scribe directly on the transverse piece and fair it?
It would be difficult to orient the transverse piece on the hull with its ends and the curve in the proper relationship.
I think I’m missing something. How is it easier to scribe on a scrap than scribe on the transverse piece? Aren’t they both pieces of plywood, more or less the same size?
Thank you for writing back.
You can certainly try scribing the curve on the transverse piece. While the concept may be easy to visualize, it’s a different story as a practical matter. I found it difficult to set a piece of plywood on the hull and hold it centered, upright, level, and square to the hull’s centerline and then scribe the curve to a measured length. I was doing the task by myself; an extra pair of hands would make it easier.
Thank you. I’m ready to go at it now.
Thanks for sharing. Looking forward to more.
Finally, a use for the weird little off-cuts of ply from our construction project!
An improvement on my 2×10 and 2×4 cart. I use swimming noodles longitudinally. I will make this with exchangeable cross-wise members to fit my kayak, cedar canvas canoe, and Walker Bay soap dish. Heck, I could make one for my Laser, which I now row more often than I sail. I will send plans of my rowing rig, made of hockey sticks. I may make a new one out of carbon fibre or aluminum hockey sticks. Who knew that wood hockey sticks are not marine grade?
Does the kickstand swing out of the way into a storage position? Does anything hold it in position when it’s in use?
Great concept and design!
The wooden kickstand is simply screwed to the side of the cart’s frame, tight enough for a friction fit so it stays where it is put. The cart is positioned so the kickstand will be on the back side. When the boat is set in place, the cart comes upright, raising the kickstand enough to clear hard ground. The kickstand will pivot if it drags in sand or hits an obstruction.
Cool cart, Chris!
How bout instead of multiple cross panels for multiple boats, finicky cut with a compass (great trick by the way!), plus pool noodle foam, scoop that hollow deeper and sling it with scrap carpet? Carpet strips are pretty easy to get ifn you have a box knife: even if a house has an alarm you can be in and out in less than a minute.